

How Do I Create A New Folder In Gmail App?
A well-organized inbox is one of the easiest ways to improve email productivity.
Fortunately, Gmail offers several effective ways to manage your inbox — the easiest being Gmail labels (or folders).
These folders enable you to organize your important emails better, making them easily accessible.
In this article, I'll first clarify how Gmail's folder system works. Then, I'll cover how to use folders in Gmail using its web app and mobile app, including how to create, nest, and remove your Gmail folders.
This Gmail Guide Contains:
(Click on links to jump to specific sections)
- Gmail Folders vs. Labels
- How to Use Folders on the Gmail Web App
- How to Create Folders on the Gmail Web App
- How to Move Emails into Folders on the Gmail Web App
- How to Assign Emails to a Folder Automatically on the Gmail Web App
- How to Nest Folders on the Gmail Web App
- How to Rename a Folder on the Gmail Web App
- How to Remove a Folder on the Gmail Web App
- How to Assign Colors to Your Folders on the Gmail Web App
- How to Show or Hide Your Folders on the Gmail Web App
- How to Use Folders on the Gmail Mobile App
- How to Move Emails into Folders on the Gmail Mobile App
- How to Move an Email to Another Folder on the Gmail Mobile App
- How to Assign Labels to an Email Automatically on the Gmail Mobile App
Let's get started.
Gmail Folders vs. Labels
Gmail doesn't have a traditional folder system like Microsoft Outlook.
Instead, it has Labels.
How are labels different from folders?
In a conventional folder system, an email can belong to only one folder. However, you can add multiple labels to an email in Gmail.
For example, it's possible to assign an email to the labels "Weekend plans" and "Personal" — without creating a copy of it for each label.
Since a Gmail label and a folder are essentially the same, I'll be using "labels" and "folders" interchangeably in this guide.
Now that you know what a Gmail folder (or label) is, let's go over how you can use it on the Gmail web app:
How to Use Folders on the Gmail Web App
Gmail's folders can help you organize your inbox better and manage emails more efficiently.
But for effective inbox organization, you'll first need to know how to create and manage labels inside Gmail. To help you out, I'll talk about:
- How to Create Folders on the Gmail Web App
- How to Move Emails into Folders on the Gmail Web App
- How to Assign Emails to a Folder Automatically on the Gmail Web App
- How to Nest Folders on the Gmail Web App
- How to Rename a Folder on the Gmail Web App
- How to Remove a Folder on the Gmail Web App
- How to Assign Colors to Your Folders on the Gmail Web App
- How to Show or Hide Your Folders on the Gmail Web App
Let's dive straight into creating folders on your Gmail web app:
A. How to Create Folders on the Gmail Web App
While there are several ways to create new folders in the desktop version of Gmail, I'll cover the two easiest methods in this guide.
i. Method 1: Using Email Options to Create Labels
Step 1
Sign in to your Gmail account.
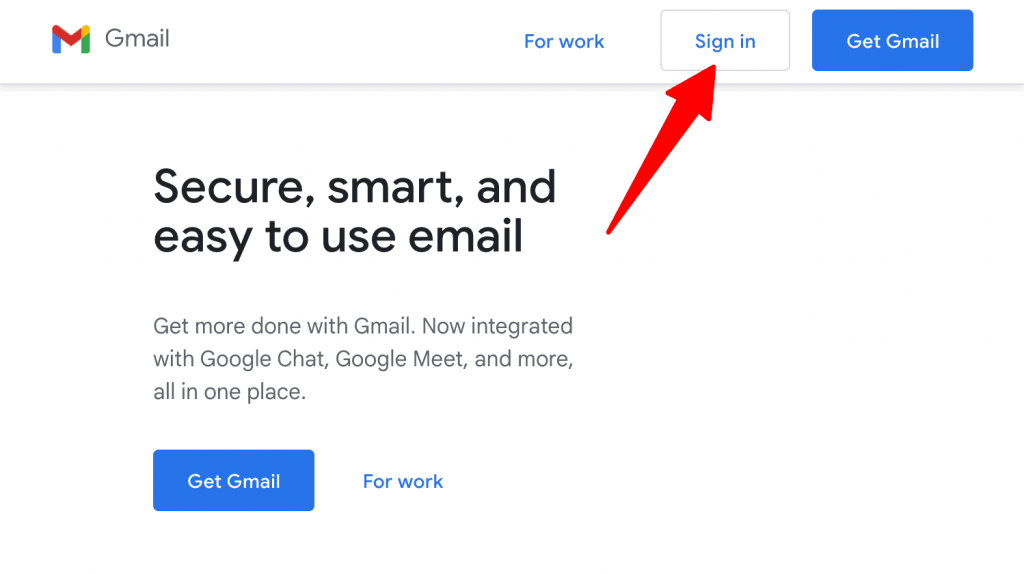
If you don't have a Gmail account, sign up and set up your new mailbox.
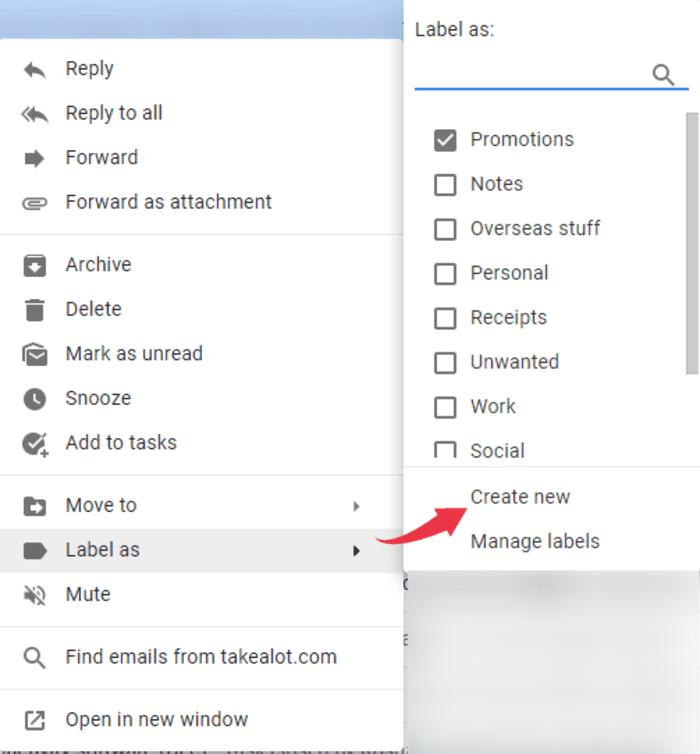
Step 2
Click the checkbox next to a message in your inbox to select it. Then, right-click on it to bring up several options.
Hover your mouse cursor over the Label as option and click Create new.
Remember, I'm using "labels" and "folders" interchangeably in this guide.
Step 3
Provide a name for your new folder in the dialog box that appears and hit the Create button when you're finished.

Note: You'll also notice the option to nest the label. You can nest one or multiple labels inside another label. Nesting a label is Gmail's equivalent of creating a subfolder .
I'll go into more detail on how to create a nested label later in this guide.
ii. Method 2: Using the left sidebar to create labels
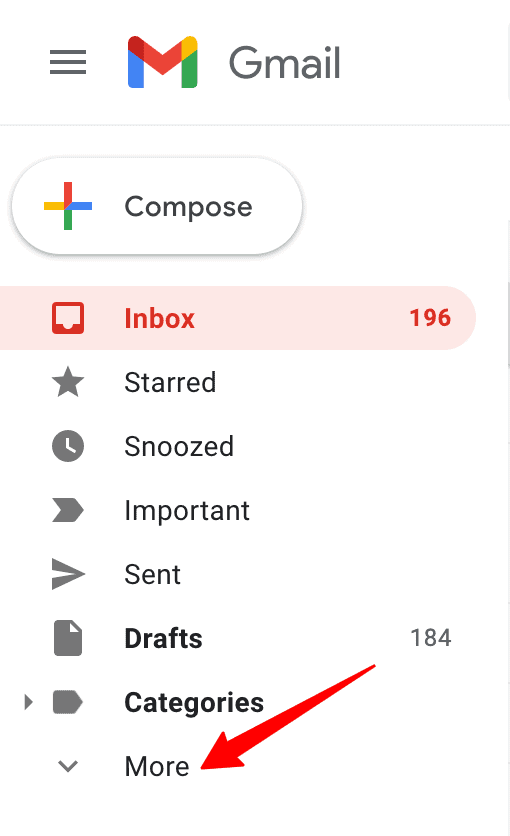
Step 1
Open Gmail and scroll down the left sidebar until you see More. Then, click the More button.
Step 2
From the additional options that appear, click + Create new label.

Step 3
A pop-up appears, asking you to name your new folder. Enter the name and hit Create.

Step 4
Instead of clicking Create new label, you can also click Manage labels in the left sidebar to open the Labels tab.
Keep scrolling down until you see the Create new label button.

Step 5
Click the Create new label button, and you'll see the same dialog box as before.
Name your new folder, click Create, and you're good to go!

Pro tip: To create a folder, you can also select an email, click the little label icon (or folder icon) below the search bar, and follow the steps outlined above.
![]()
Once you've created your new folder, you can add the relevant emails to it.
Go back to Contents
B. How to Move Emails into Folders on the Gmail Web App
Moving your important emails into Gmail folders is much easier than creating new folders.
Here's how to do it on Gmail's desktop version:
Step 1
To move a single email, click and hold to drag the message and drop it in the desired label on the left sidebar.
Step 2
If you'd like to move multiple emails at a time, check the boxes on the left of the emails you want to move.
![]()
Then, click and hold to drag them over to the required folder on the left sidebar.
Step 3
Alternatively, you can right-click the message you want to move, click the Move to option, and select your desired folder from the list.
But how do you move important emails to a folder automatically? Let's find out.
C. How to Assign Emails to a Folder Automatically on the Gmail Web App
Gmail also lets you avoid the hassle of manually assigning emails to folders.
All you have to do is create automatic email filters!
Here's how it works:
Step 1
Once you open Gmail, click the Show more options icon in the search bar at the top of the screen.

Step 2
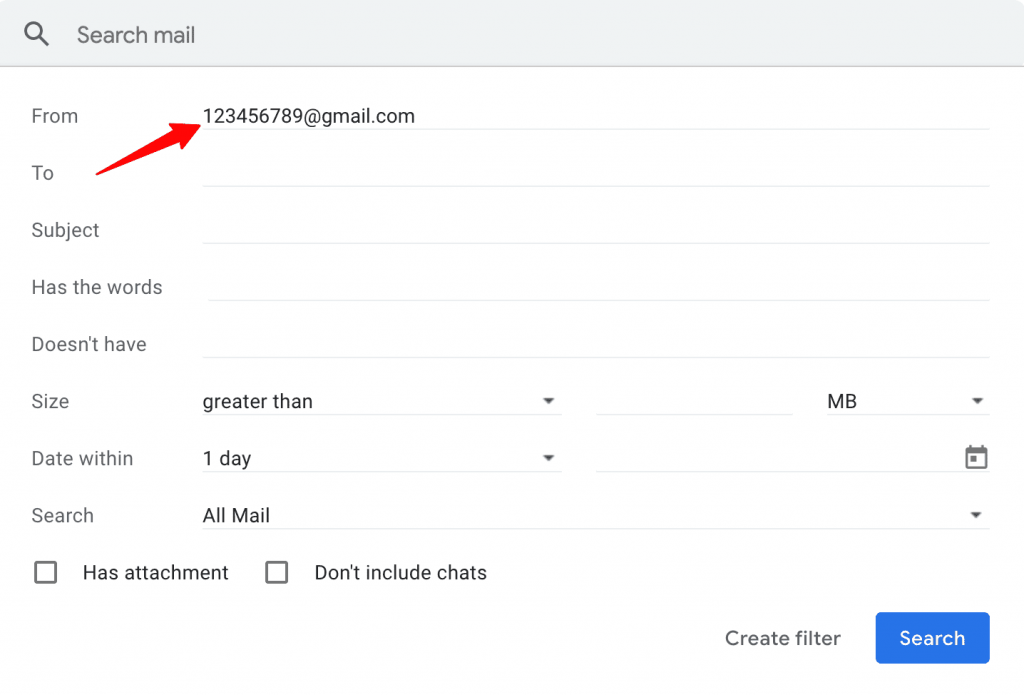
If you want future emails from a specific email address redirected automatically to a chosen folder, enter that email address in the From field of the drop-down menu that appears.
This way, all future emails from this email address will automatically go to the folder you assign.
Note: You can also fill in other filter criteria to create a more restrictive filter.
Step 3
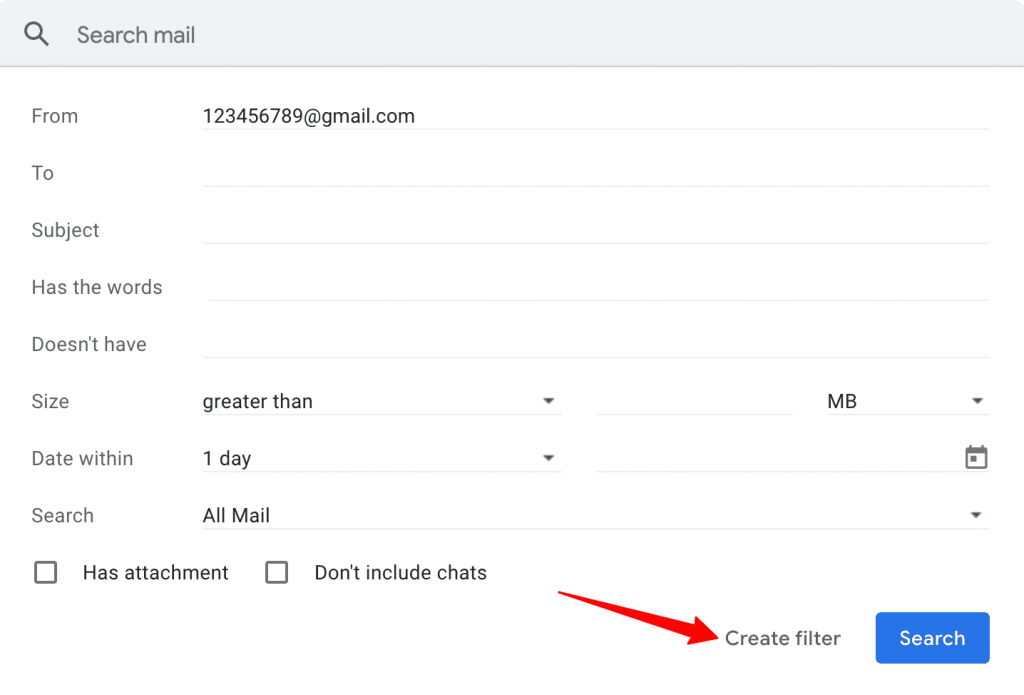
Click the Create filter button when you're done.
Step 4
From the new window that appears, select the Apply the label to add a label to these emails. Then, choose which label to apply.
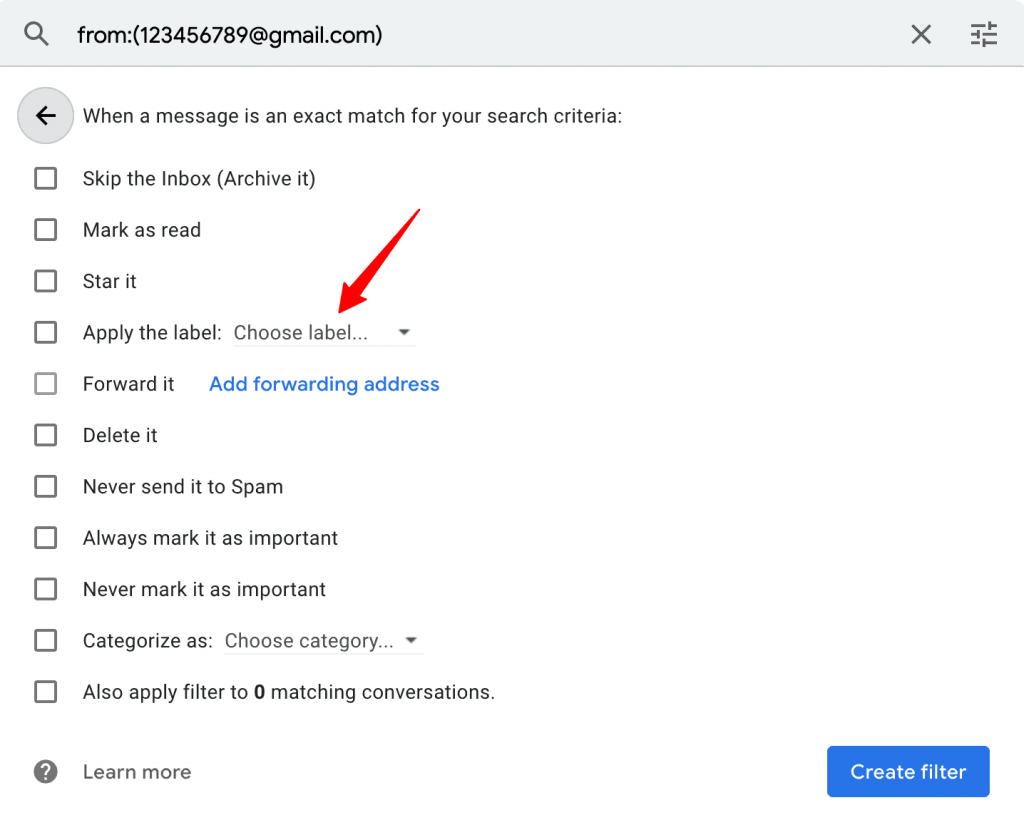
Step 5
Finally, click the Create filter button.
Gmail will now send all incoming emails from that email address to the specific folder you have chosen.
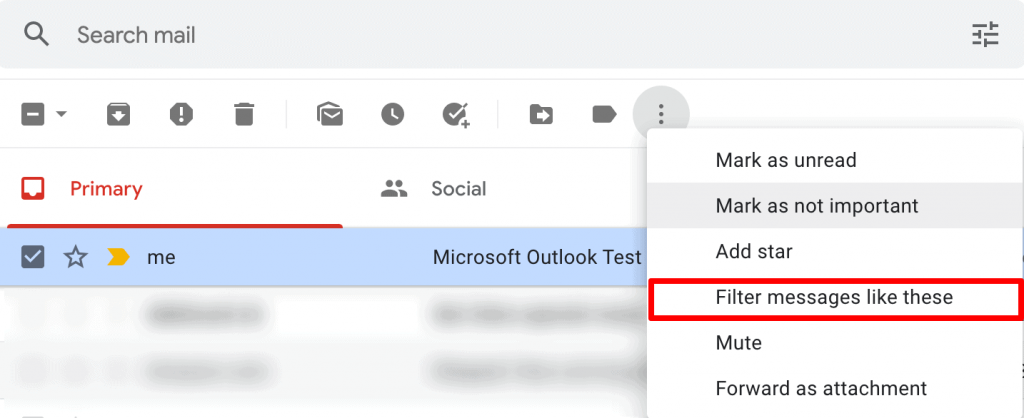
Alternatively, open the specific emails to which you want to apply a filter, and click the three vertical dots next to the label icon (folder icon).
![]()
From the drop-down menu that appears, select Filter messages like these and follow the steps outlined above.
Go back to Contents
Next, I'll discuss the steps to nest a folder inside another in Gmail.
D. How to Nest Folders on the Gmail Web App
Nesting folders in Gmail is very similar to creating subfolders inside a parent folder.
i. Method 1: Create a New Nested Folder in an Existing folder
Here's how to create a new nested label inside an existing label:
Step 1
Open your Gmail inbox. Then, navigate to the label list on the left-hand side of the screen, and find the label you want to make the parent label.
Step 2
Hover your mouse over the folder and click on the three vertical dots that appear. Then, from the list of options available, pick Add sublabel.
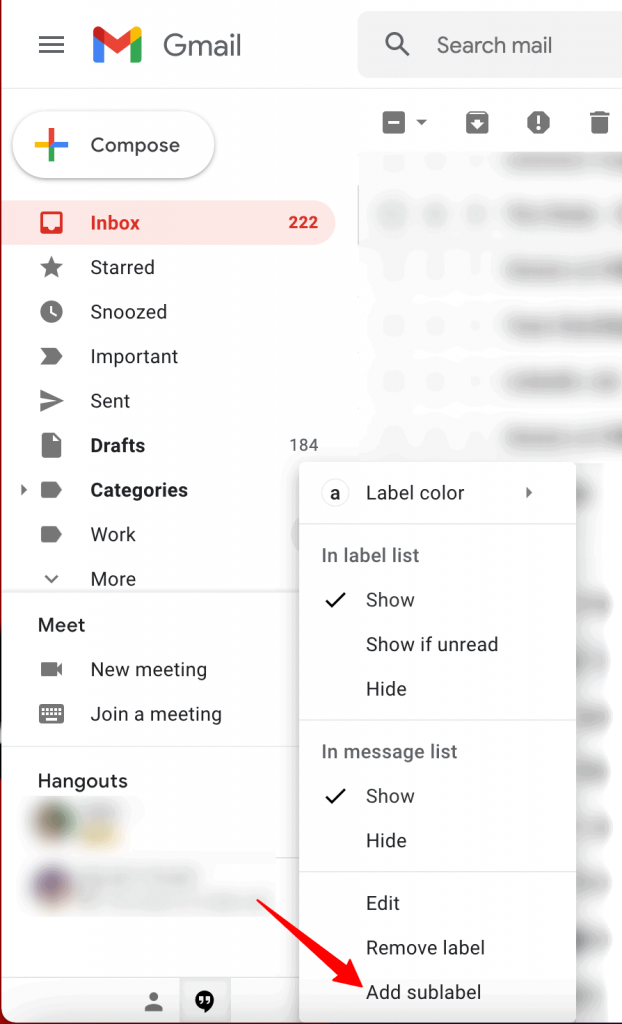
Step 3
Then, give it a name and hit Create.

ii. Method 2: Turn an Existing Folder into a Subfolder
Follow the steps below to take an existing label or folder and turn it into a subfolder:
Step 1
Hover your mouse cursor over the desired folder to reveal the three vertical dots.
Then, click Edit from the drop-down menu.
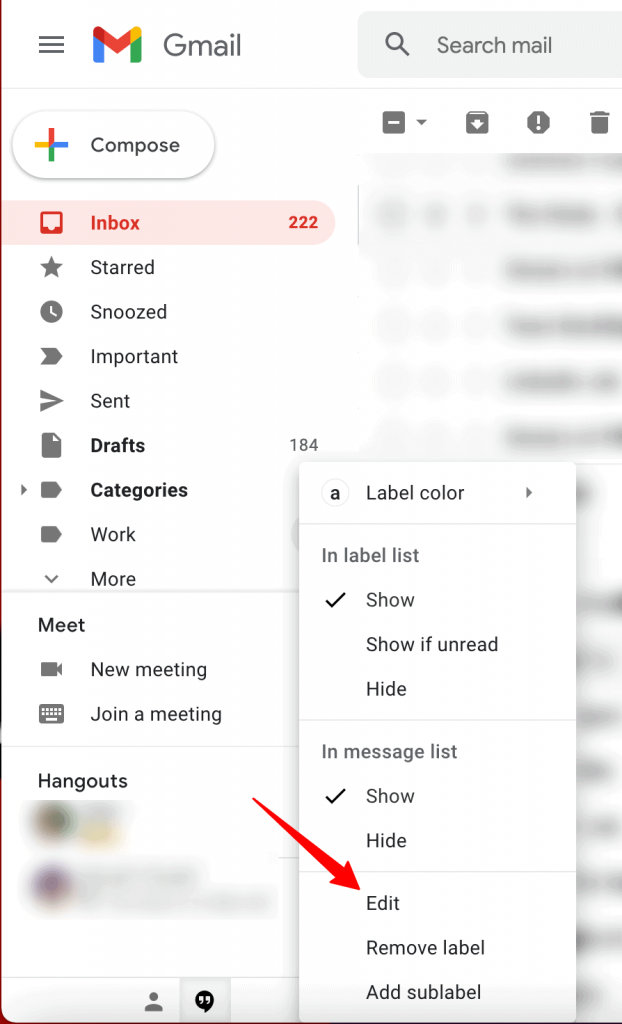
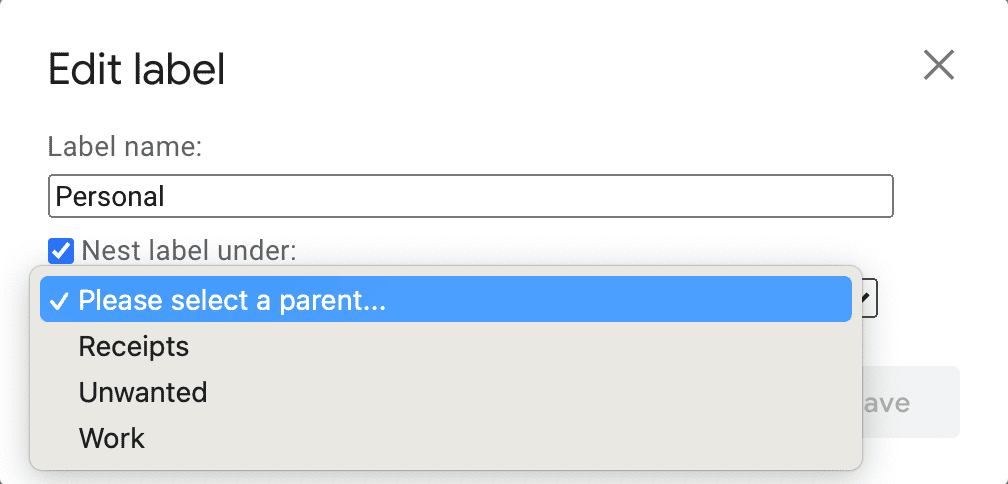
Step 2
All that's left is to choose which folder it should be nested under — click your choice.
Besides creating, moving, and nesting folders, you might often need to rename folders. I'll share the steps to do so in Gmail.
Go back to Contents
E. How to Rename a Folder on the Gmail Web App
Want to change the folder names you've already created?
Here's how to do it:
Step 1
From Gmail's left sidebar, select the particular label you want to rename and hover your mouse over it to reveal the three vertical dots.
Step 2
Click Edit and rename the folder.

Type in the new name and save. That's all there is to it!

Now how do you delete a folder from Gmail? Let's explore that next.
F. How to Remove a Folder on the Gmail Web App
Follow the below steps to remove a label from the Gmail web app:
Step 1
From your inbox, find the folder you want to remove from the left sidebar and open it.
Step 2
Then, click the three vertical dots next to the folder name and click the Remove label button from the drop-down menu.
This is a Delete Folder equivalent as it removes the folder from Gmail.
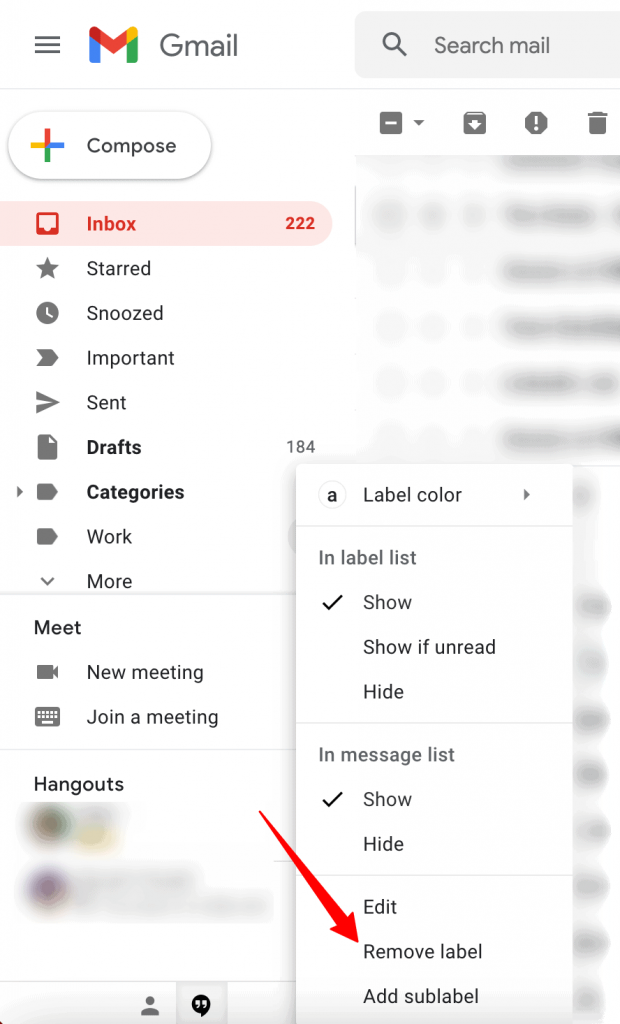
Note: When you remove a label, Gmail doesn't delete the emails under that label. It only erases the label.
Go back to Contents
G. How to Assign Colors to Your Folders on the Gmail Web App
If you want to maximize your inbox organization, you can assign different colors to your folders to easily differentiate between them.
For example, you can mark an important folder in a bright color like red to make it easy to spot.
Here's how to color-code your Gmail folders on the web app:
Step 1
In your mailbox, go to the left sidebar and find the folder you want to color.
Step 2
Hover your mouse over the desired folder and click the three vertical dots that appear.
Step 3
Then, click Label color from the drop-down menu and pick the color of your choice.

H. How to Show or Hide Your Folders on the Gmail Web App
If you have tons of folders and don't want them crowding up your sidebar, Gmail lets you choose between showing and hiding folders.
To do this, follow these simple steps:
Step 1
From your Gmail inbox, click the More option from the left sidebar.

Step 2
Next, click the Manage labels option.

Step 3
This will take you to the Labels tab, where you can see all your folders listed.

To select the folders you want to make visible or not, click the show or hide buttons next to the folder name.
Go back to Contents
Next, I'll go over how you can use and manage folders on the Gmail web app:
How to Use Folders on the Gmail Mobile App
The Gmail mobile app lets you move emails and also automatically assign email addresses to folders.
I'll show you how to:
- How to Move Emails into Folders on the Gmail Mobile App
- How to Move an Email to Another Folder on the Gmail Mobile App
- How to Assign Labels to an Email Automatically on the Gmail Mobile App
Let's first go over how to move emails to folders on the mobile app.
A. How to Move Emails into Folders on the Gmail Mobile App
While the mobile app won't let you create new folders, you can move emails into your existing folders.
Here's how to do it:
Step 1
Open the Gmail app on your mobile device.
Step 2
Select the message or messages you want to move from the Gmail inbox.

Step 3
There are three vertical dots at the upper right corner of the mail app screen; tap on them.

Step 4
Now tap Move to and select the desired folder.

This is how the Move to (destination folder) window looks:

It's a label list from which you can select the folder of your choice.
Go back to Contents
B. How to Move an Email to Another Folder on the Gmail Mobile App
If you wish to move your emails from one Gmail folder to another, you can do so easily on the mobile app.
Step 1
Open the Gmail app on your mobile device and click on the Menu icon. If you don't have a Gmail account, download the mobile app, sign up, and set up your brand new mailbox.
![]()
Step 2
Click on the folder that contains the email to be moved.

Step 3
Select the email you want to move to a different folder and click on the three-dots icon on the upper right corner of the mail app screen. To move multiple emails, click on the checkbox next to them to select them.
![]()
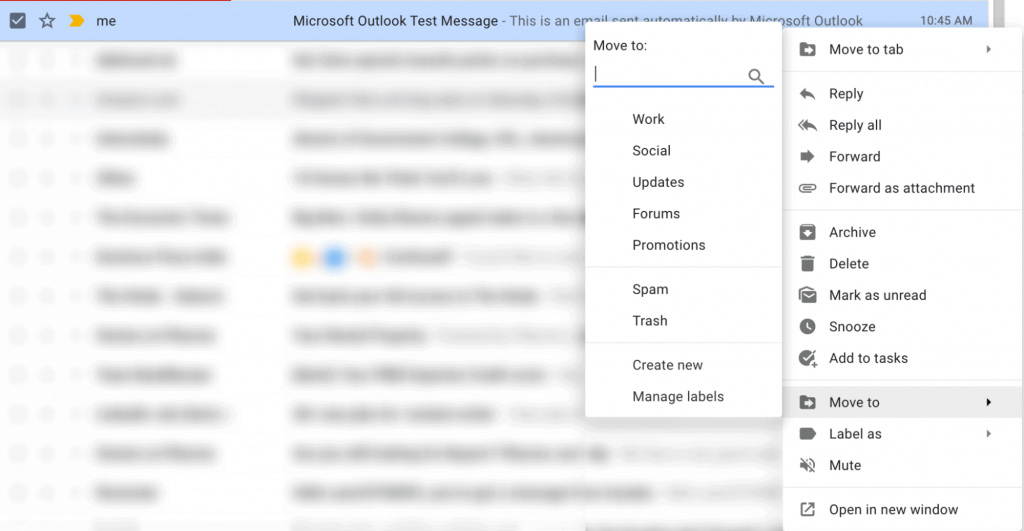
Step 4
From the drop-down menu, click on the Move to option and select the desired label.
![]()
The Move to window will have all the folder names except the parent label (parent folder) that contains the selected email.

Go back to Contents
You can also use Gmail's mobile app to redirect emails directly to specific folders.
Curious?
I'll go over that next.
C. How to Assign Labels to an Email Automatically on the Gmail Mobile App
Note: You can only assign labels automatically in iOS devices to move incoming emails to a specific folder . This feature is absent in Gmail's Android mobile app .
Here are the steps to automatically assign labels to a folder on the Gmail mobile app on iOS devices.
Step 1
Open the Gmail app and click on the Menu icon.
![]()
Step 2
From the Menu, click on Settings.

Step 3
Select your Gmail account.

Step 4
From the list of options in the Settings Menu, click on Label settings.

Step 5
From the list of labels, click on the label name of the particular folder. In the subsequent label window, click on Add.


Step 6
Type a name or email in the "From" field. To add other search criteria (like a keyword), click on And. Then, click Save.
Specific emails from the email address will now be automatically sent to the folder.

Note: You can't rename or edit a Gmail folder from the mobile app . You also cannot create a custom folder (custom label) in the mobile app either.
Go back to Contents
Wrapping Up
Organizing your mailbox can be a pain. But with Gmail folders, it becomes far easier!
You can quickly create, delete, rename, and even assign colors to folders in minutes. And while the mobile app may lack some features, the web app more than makes up for it.
Try out the handy steps I covered here to organize your Gmail inbox easily!

Ajay is the founder of GMass and has been developing email sending software for 20 years.
How Do I Create A New Folder In Gmail App?
Source: https://www.gmass.co/blog/how-to-create-folders-in-gmail/
Posted by: newelldary1945.blogspot.com
0 Response to "How Do I Create A New Folder In Gmail App?"
Post a Comment